Plunger for Clogged Sink: The Ultimate Guide to Unclogging Your Drain
Introduction
A clogged sink can be a frustrating and inconvenient household issue. Whether it’s in your kitchen or bathroom, a blocked drain can lead to slow drainage, unpleasant odors, and even water damage. One of the most effective tools for dealing with this problem is a plunger. In this guide, we’ll cover everything you need to know about using a plunger for a clogged sink, including the types of plungers, step-by-step instructions, and additional tips to prevent future clogs.
Why Use a Plunger for a Clogged Sink?
A plunger is one of the simplest and most effective tools for unclogging a sink. It creates a vacuum or pressure effect to dislodge obstructions in the drain. Using a plunger is cost-effective, eco-friendly, and does not require harsh chemicals that could damage your plumbing system.
Types of Plungers for Sinks
Not all plungers are created equal. Here are the main types of plungers and which one works best for a clogged sink:
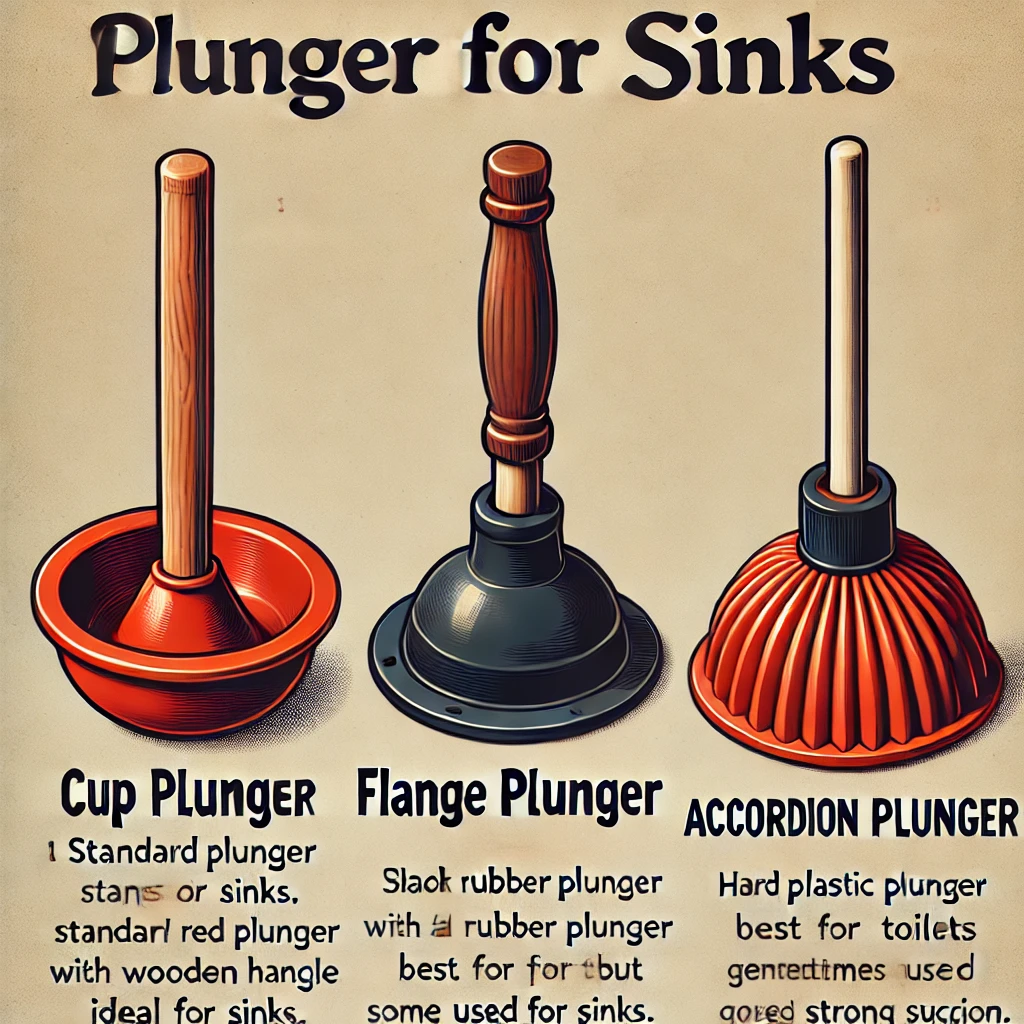
- Cup Plunger – This is the most common type of plunger, featuring a rubber cup attached to a wooden or plastic handle. It works best for flat surfaces like sink drains.
- Flange Plunger – Designed primarily for toilets, this plunger has an extended flange for better suction in curved drains.
- Accordion Plunger – Also suited for toilets, this plunger generates powerful suction but may not be ideal for sink drains.
For a clogged sink, a cup plunger is the best choice.
How to Use a Plunger to Unclog a Sink
Follow these simple steps to effectively use a plunger on your sink:
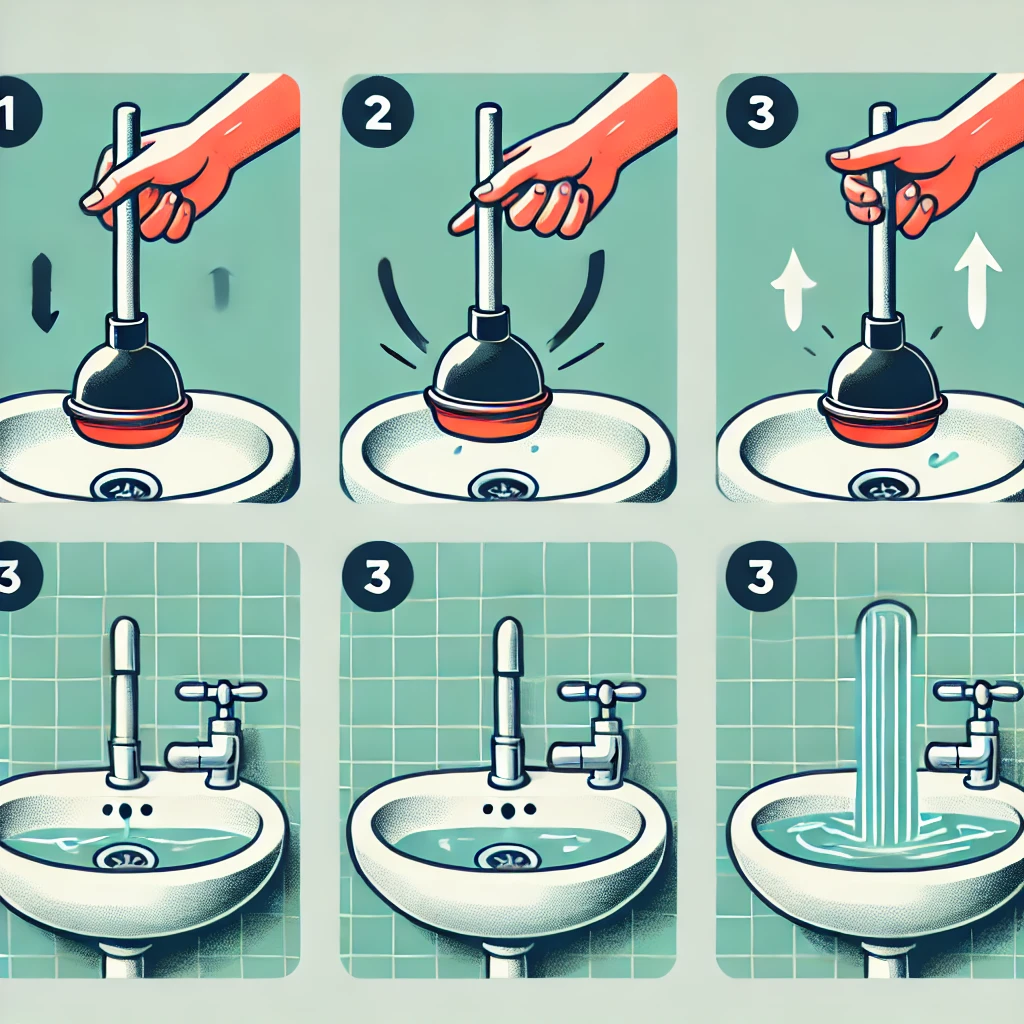
Step 1: Prepare the Sink
- Remove any standing water so that the plunger can create a proper seal.
- If you have a double sink, seal off the other drain with a wet cloth or stopper to maximize suction.
- Remove the sink stopper or drain cover if possible.
Step 2: Position the Plunger
- Place the cup plunger directly over the drain, ensuring it covers the entire opening.
- Press down to create a good seal.
Step 3: Plunge Properly
- Begin plunging with firm, consistent up-and-down motions for about 20-30 seconds.
- Maintain the seal and ensure water moves up and down, which indicates suction.
- If the clog does not clear, repeat the process a few more times.
Step 4: Test the Drain
- Remove the plunger and run warm water down the drain.
- If the water drains smoothly, the clog is cleared. If not, repeat the plunging process or consider using an alternative unclogging method.
Alternative Methods for Unclogging a Sink
If a plunger does not work, here are some additional methods:
- Baking Soda and Vinegar: Pour ½ cup of baking soda followed by 1 cup of vinegar. Let it sit for 15 minutes, then flush with hot water.
- Boiling Water: Pour a pot of boiling water down the drain to dissolve grease or soap buildup.
- Drain Snake or Auger: Use a plumber’s snake to physically remove stubborn clogs.
- Chemical Drain Cleaners: As a last resort, use a drain cleaner, but avoid overuse as they can damage pipes.
How to Prevent Future Sink Clogs
Preventative measures can help keep your sink drain clear:
- Use a drain strainer to catch food particles, hair, and debris.
- Avoid pouring grease or oil down the drain.
- Run hot water regularly to prevent buildup.
- Clean your sink drain monthly using natural cleaners like baking soda and vinegar.
Conclusion
A plunger is a simple yet effective tool for unclogging a sink. By using the right type of plunger and following proper plunging techniques, you can easily clear most sink blockages. If the clog persists, consider alternative solutions or consult a professional plumber. Keeping your sink drain clean and practicing preventive maintenance can help you avoid future clogs and keep your plumbing in top condition.
With this comprehensive guide, you now have everything you need to confidently tackle a clogged sink using a plunger.